LAN => 192.168.0.100 (Static configuration)
WAN => 192.168.58.129 ( DHCP Configuration)


URL : squid.amceconsulting.it

Step 3 - After downloading, go to downloaded location and extract. Then copy the extracted folder "squid" to c:\ drive.


Step 6 - Now, we want to create squid swap/cache directory, for that run "squid -z".


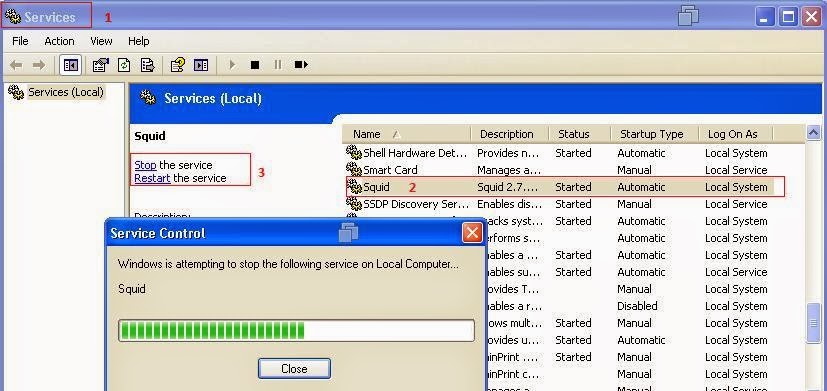
Step 8 - To check squid service is running or not, go to Windows Task Bar => Process => Squid.exe


Note : If you want to change any settings, restart the service after changing.
Step 11 - Now, check the internet connection on server is working or not by using the browser. Before that, we need to change some settings on browser.


Here, ping option not responding because internet working through browser.


My Configuration Example :
acl IP-Range src 192.168.0.0/24
acl Admin src "C:\squid\etc\Admin-IP.conf"
acl LAN1 src "C:\squid\etc\Lan1-IP.conf"
acl Block-URL dst "C:\squid\etc\Ban-Site.conf"
acl Blocak-Domain dstdomain "C:\squid\etc\Block-Domain.conf"
acl Bloack-keyword url_regex "C:\squid\etc\Keywords.conf"
acl SSL_ports port 443
acl SSL_ports port 10000 # Webmin
acl SSL_ports port 2082-2099 # WHM/Cpanel
acl Safe_ports port 80 # http
acl Safe_ports port 20-21 # ftp
acl Safe_ports port 443 # https
acl Safe_ports port 70 # gopher
acl Safe_ports port 210 # wais
acl Safe_ports port 1025-65535 # unregistered ports
acl Safe_ports port 280 # http-mgmt
acl Safe_ports port 488 # gss-http
acl Safe_ports port 591 # filemaker
acl Safe_ports port 777 # multiling http
acl CONNECT method CONNECT
# Only allow cachemgr access from localhost
http_access allow manager localhost
http_access deny manager
# Deny requests to unknown ports
http_access deny !Safe_ports
# Deny CONNECT to other than SSL ports
http_access deny CONNECT !SSL_ports
# And finally deny all other access to this proxy
#http_access deny all
http_access allow Admin
http_access allow LAN1
http_access deny Block-URL !Admin
http_access deny Blocak-Domain !Admin
http_access deny Bloack-keyword !Admin
# DISK CACHE OPTIONS
cache_dir ufs c:/squid/var/cache 4000 16 256
# MEMORY CACHE OPTIONS
cache_mem 64 MB
# ADMINISTRATIVE PARAMETERS
cache_mgr network@reubro.com
# DNS OPTIONS
dns_nameservers 8.8.8.8 8.8.4.4
# NETWORK OPTIONS
http_port 3128
reply_body_max_size 150 MB all !Admin
# ADMINISTRATIVE PARAMETERS
visible_hostname localhost
That's it...
i want to load ICSDHCP.D11 SOFTWARE ON MY COMPUTER pLEASE HELP ME .
ReplyDelete